The Final Output, Generating Font Files
Although you can do a wide range of testing within FontForge itself, you will need to generate installable font files in order to perform real-world testing during the development process. In addition, your ultimate goal is, of course, to create a font that you can make available in an output format for other people to install and use. You will use the Generate Fonts tool (found in the File menu) to build a usable output font regardless of whether you are making it for your own testing purposes or to publish it for consumption by others, but you will want to employ a few extra steps when building the finished product.
FontForge can export your font to a variety of different formats, but in practice only two are important: TrueType (which is found with the .ttf filename extension) and OpenType CFF (which is found with the .otf extension). Technically the OpenType format can encompass a range of other options, but the CFF type is the one in widespread use.
Quick and dirty generation for testing
To build a font file for testing purposes — such as to examine the spacing in a web browser — you need only to ensure that your font passes the required validation tests.
You can use the Validate Font tool found in the Element menu to do this (see Making Sure Your Font Works, Validation for a more detailed explanation), or you can select all of the glyphs (hit Ctrl + A or choose “Select” > “Select All” from the “Edit” menu) then run a few commands to apply some basic changes in bulk. Be sure to save your work before you proceed any further, though: some of the changes required to validate your font for export will alter the shapes of your glyphs in subtle ways.
For OpenType fonts, first correct the direction of all of your paths. Hit Ctrl + Shift + D or choose “Correct Direction” from the “Element” menu. Next, check to make sure that you have not left any unclosed paths. Choose “Find problems” from the “Element” menu, select the Open paths option in the “Paths” tab, and click OK to run the test. Once your font passes the test without errors, you are ready to generate OpenType output.
For TrueType fonts, a few additional steps are required. You should first correct the direction of all of your paths as described above. Next, adjust all points to have integer coordinates, either hit Ctrl + Shift + _ (underscore), or choose To Int from the “Element” > “Round” menu. Finally, open the “Find Problems” tool, select the Open paths test as described above, and also select all of the tests in the “Refs” tab.
After you can run these tests without errors, you will then need to convert your paths to quadratic curves. Open the “Font Info” window from the “Element” menu. Click on the “Layers” tab, and check the All layers quadratic option. Click OK at the bottom of the window, and you are ready to generate TrueType output.
Building the font files
Open the Generate Fonts window by choosing it from the “File” menu. The top half of the window shows the familiar file-chooser options — a list of the files found in the current directory, a text-entry box for you to enter a filename, and buttons to navigate to other folders and directories if necessary. This is strictly a means to help you quickly find the right place to save your output file, or to choose an existing font file if you intend to overwrite a previous save. All of the options you need to look at are found in the bottom half of the window.
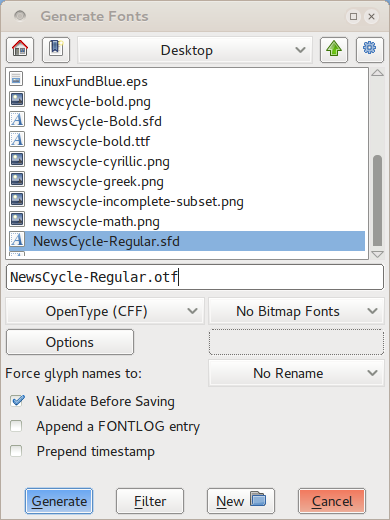
On the left-hand side is a pull-down menu from which you select the format of the font you wish to generate. You should choose either TrueType or OpenType (CFF), as discussed earlier. On the right-hand side, make sure No Bitmap Fonts is selected. On the line below, make sure No Rename is selected for the “Force glyph names to:” option. You can check the “Validate Before Saving” option if you wish (to potentially catch additional errors), but this is optional. Leave the “Append a FONTLOG entry” and “Prepend timestamp” options unchecked.
Click the “Generate” button, and FontForge will build your font file. You can load the font in other applications and run any tests, but when you are ready to return to editing, remember to re-open the saved version of your font that you created before generating your .ttf or .otf output.
Generating for final release
Designing your font is an iterative process, but eventually the day when come when you must declare your font finished — or at least ready for public consumption. At that point, you will again generate a .ttf or .otf output file (perhaps even both), but before doing so you will need to work through a few additional steps to create the most standards-compliant and user-friendly version of your font file.
First, follow the same preparation steps outlined in the section on quick and dirty generation for testing purposes. In particular, remember to change your font to All layers quadratic if you are creating a TrueType file.
Remove overlaps
As you know, it is a good idea to keep your letter-forms as combinations of discrete components as you design: stems, bowls, serifs, and other pieces of each glyph. But although this technique is great for designing and refining forms, you want your final, published font to have simple outlines of each glyph instead. This reduces file size a bit, but more importantly it cuts down on rendering errors.
FontForge has a Remove Overlap command that will automatically combine the separate components of a glyph into a single outline. Select a glyph (or even select all glyphs with Ctrl + A), then hit Ctrl + Shift + O or choose Remove Overlap from the “Element” > “Overlap” menu. One caveat is worth watching out for, however: FontForge cannot merge shapes if one of the shapes is traced in the wrong direction (that is, if the outermost path is counterclockwise). A path traced in the wrong direction is an error of its own, though, which you should fix anyway.
Simplify contours and add extrema points
You should also simplify your glyphs where possible — not eliminating details, but eliminating redundant points. This reduces file sizes slightly for every glyph, which adds up considerably over the entire set of characters in the font.
From the “Element” menu, choose “Simplify” > Simplify (or hit Ctrl + Shift + M). This command will merge away redundant on-curve points in all of the selected glyphs. In some cases, there will be only a few points removed, in others there may be many. But it should perform the simplification without noticeably changing the shape of any glyphs. If you notice a particular glyph that is altered too much by Simplify, feel free to undo the operation. You can also experiment with the Simplify More command also located in the same menu; it offers tweakable parameters that could prove helpful.
In any event, after you have completed the simplification step, you will need to add any missing extrema points. Choose Add Extrema from the “Element” menu (or hit Ctrl + Shift + X). As discussed earlier, it is a good idea to place on-curve points at the extrema of every glyph as you edit. Nevertheless, you must still perform this step when preparing for final output generation because the Simplify step will occasionally remove an extrema point.
Round everything to integer coordinates
The final preparation step to perform is to round all points (both on-curve points and control points) to integer coordinates. This is mandatory for generating TrueType output, but is highly recommended for OpenType output as well. It can result in sharper rendering and better grid-fitting when the fonts are displayed, without any additional design work.
To round all points to integer coordinates, choose “Element” > “Round” > To Int.
As soon as this operation is completed, you may notice something puzzling. Sometimes, simply due to the peculiarities of the curves involved, the processes of rounding to integer coordinates, simplifying glyphs, and adding missing extrema can work against each other. An example of when this might occur is when a curved outer edge has a control point that lies just past the horizontal or vertical; in this situation rounding it to integer coordinates can shift the curve slightly and change where the extrema lies.
There is not a one-shot solution to this conundrum; the only guaranteed fix is to repeat the cycle of steps for the affected glyphs until they stabilize at a point where the three operations no longer interfere with each other. This may take multiple cycles, but it is a rare occurrence.
Validate
Your font should pass the required validation tests before you generate your final output. As with the rounding-points-to-integer-coordinates step, though, sometimes the other preparatory operations can introduce errors, so it is always a good idea to run the whole-font validator at this stage before building the final output. Making Sure Your Font Works, Validation will give you more detail on what to check.
A word about hinting
Hinting refers to the use of mathematical instructions to render the vector curves in a font in such a way that they line up nicely with the pixel grid of the rasterized output device (whether that grid is composed of dots of ink or toner on paper, or luminescent dots on a computer monitor).
FontForge allows you to hint your font (and even provides an Autohint function), but in practice this step is not strictly necessary. Modern operating systems often have better grid-fitting functionality built into their text rendering engines than you can create yourself without expending considerable time and effort. In fact, Mac OS X and Linux both ignore any hints embedded in the font file itself. If you do decide your font needs hinting for the benefit of Windows users, your best bet is to build the font without embedded hints, then use a specialized application such as ttfautohint to add hinting after the fact.
For more, see this video on CFF hinting from Adobe at RoboThon.
To set the PS hinting with Python is possible: private is a list of tuples. (Thanks Sungsit!)
font.private['BlueValues'] = (-20, 0, 600, 620, 780, 800, 810, 830)
font.private['OtherBlues'] = (-225, -210)
font.private['StdHW'] = 100,
font.private['StdVW'] = 137,
Check your metadata
Last but certainly not least, once your font has been thoroughly prepared technically for export, you should pause and update the font metadata, making sure that important metadata information is included, and that it is up to date.
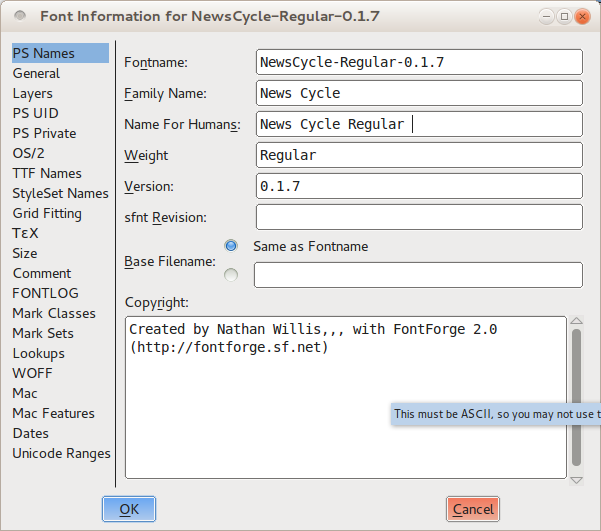
First, if this is the initial release of your font, open the Font Info dialog from the “Element” window, and select the “PS Names” tab. Fill in the font’s Family Name and Weight first, then copy that information into the “Name for Humans” box. Although using version numbers is not required, it is extremely helpful for you as a designer to differentiate between different revisions of your work. Enter “1.0” as the “Version” number if you are not sure. Next, visit the “TTF Names” tab and enter the same information.
As is the case with version numbers, it is helpful in the long run for you to make log entries for each revision. Go to the “FONTLOG” tab and write a brief sentence or two explaining what changes if any have gone into the revision that you are building for release. If this is your initial log entry, you should also describe your font and its purpose in a sentence or two.
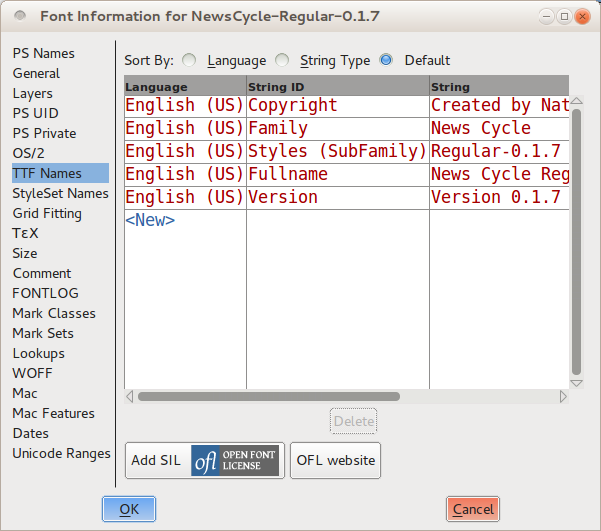
Fonts, like all creative works, need to have a license, so users will know what they are and are not allowed to do. FontForge has a button in the “TTF Nmes” tab labelled “Add SIL Open Font License.” The Open Font License (OFL) is a font license designed to allow you to share your font with the public with very few restrictions on how where it is used, while still protecting you as the designer from having others take credit for your work or creative derivatives of your font that will be confused for the original. Clicking the button will add “License” and “License URL” strings to the TTF Names metadata. If you have another license you would prefer to use instead of the OFL, enter it in the “License” field instead.
If you have made significant changes to other features of your font, it is a good idea to double-check the other font-wide settings in the Font Info window, and make sure everything is still up to date. Line spacing information, for example, is found in the “OS/2” tab under “Metrics.”
Building the font files
The process for generating the font output files is the same when you are building the final release as it is when you are building a quick-and-dirty copy for testing, but you will want to pay closer attention to some of the options.
Open the Generate Fonts window by choosing it from the “File” menu. Again, the top half of the window allows you to choose the directory and file name to give to your output file — just be careful that you do not overwrite a previous save.
In the left-hand side pull-down menu, select the format of the font you are generating — either TrueType or OpenType (CFF), as discussed earlier. On the right-hand side, make sure No Bitmap Fonts is selected. On the line below, make sure No Rename is selected for the “Force glyph names to:” option. You can check the “Validate Before Saving” option if you wish (to potentially catch additional errors), but this is optional. Leave the “Append a FONTLOG entry” and “Prepend timestamp” options unchecked.
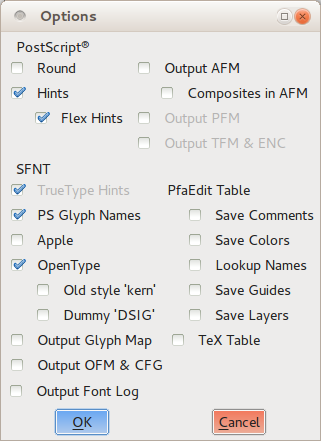
Next, click on the “Options” button. Select the PS Glyph Names, OpenType, and Dummy DSIG options in the window that pops up, and deselect everything else.
Click the “Generate” button, and FontForge will build your font file. One final note: it is important not to overwrite the saved version of your FontForge work with the modifications you made in this section solely to generate your .ttf or .otf output. For example, you lose a lot of individual glyph components when you perform the Remove overlaps operation. But the next time you resume work on your font, you will definitely want to pick up where you left off in the original, individual-glyph-component-filled version.
Consequently, if you decide to save the modified version of your FontForge file, be sure that you rename it in a memorable way, such as MyFont-TTF.sfd or MyFont-OTF.sfd. But, you do not necessarily need to save these output-oriented variations of your file at all — in practice, the next time you revise your original work in FontForge, you will work through the output preparation steps again anyway.
Congratulations are in order! You have now created your first font. All that remains now is for you to share your work: upload it to the web, post it to your blog, and go tell your friends.
Without doubt, you will be back and continue revising and refining your typeface — after all, as you have seen, font design is a highly iterative process. But be sure that you pause and take this moment to enjoy what you have accomplished first.