Making Sure Your Font Works, Validation
In a perfect world, your font would be ready to build and install on any modern computer without any special effort, but reality is messier — particularly during the design process. Fonts can have technical errors that prevent them from working or displaying correctly. For example, curves that intersect themselves will not render correctly because they do not have a “inside” and “outside”. The various font file formats also expect glyphs to adhere to certain rules that simplify placing the text on screen, and fonts that break the rules can cause unexpected problems. An example of this type of issue is that all of the points on a curve should have coordinates that are integers. Finally, there are stylistic errors that are not technically incorrect, but that you will still want to repair — such as lines that are intended to be perfectly horizontal or vertical, but are accidentally slightly off-kilter.
FontForge offers tools that you can use to locate (and, in many cases, repair) all three categories of problems. Validating your font to eliminate these errors will thus not only ensure that it can be installed and enjoyed by users, but also that the finished project exhibits polish.
Find Problems
The first tool is called Find Problems, and is found under the Element menu. You must first select one or more glyphs — either from the font view, the outline view, or the metrics view — then open the Find Problems tool. The tool presents you with an assortment of potential problems in eight separate tabs.
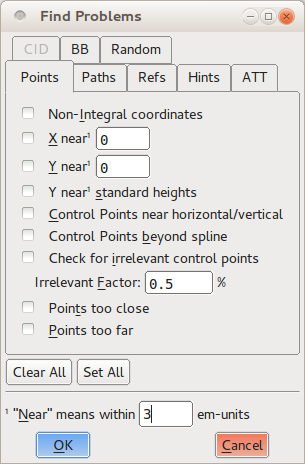
You can select which problems you are interested in looking for by checking the checkbox next to each, and in some cases providing a numeric value to check the font against. When you click the OK button, the tool will examine all of the selected glyphs, and report any problems it finds in a dialog box.
The problems that the Find Problems tool can look for are sorted into these eight groups:
- Problems related to points
- Problems with paths and curves
- Problems with references
- Problems with hinting
- Problems with ATT
- Problems specific to CID-keyed fonts
- Problems with bounding boxes
- Miscellaneous other problems
Not every check is necessary; some apply only to specific scripts or languages (such as those in the “CID” tab), while others apply only to specific, optional font features (such as the checks in the references tab). But you should check that your font passes those tests that examine the glyphs for required features, and several tests that look for optional but commonly-expected behavior. Several of the other tests provide feedback and guidance to you during the design process, and are worth exploring for that reason.
First things first: test for required features
In the “Points” tab, select the Non-Integral Coordinates test. This test makes sure that all of the points in each glyph (including both on-curve points and control points) have integer coordinates. Not every font output format requires this behavior, but some do.
In the “Paths” tab, select the options Open paths and Check outermost paths clockwise. These are both mandatory features in all fonts; the first looks for any curves that are not closed shapes, and the second makes sure that the outer curves of every glyph are traced in clockwise order. It is a very good idea to check Intersecting paths as well; although modern font formats can support two intersecting paths, curves that insect with themselves are not allowed. In addition, if a glyph has any self-intersecting paths then FontForge cannot perform the Check outermost paths clockwise test.
In the “Refs” tab, select all six tests. These checks all relate to references, in which a glyph includes paths from another glyph. For example, an accented letter includes a reference to the original (unaccented) letter, plus a reference to the accent character. All of the tests in the “Refs” tab are mandatory for at least one common output format, and all are good ideas.
Similarly, select all of the tests in the “ATT” tab. These tests look for missing glyph names, substitution rules that refer to non-existent glyphs, and other problems related to glyph names or OpenType features. The problems they guard against are uncommon, but all will cause the font to be considered invalid by one or more computer system, so they are worth including.
Make life easier for your users: test for good behavior
The tests listed above will ensure that your font installs and renders correctly according to the rules set out by the various font formats, but there are a handful of others tests you should consider adding — especially at the end of the design process — simply because they check for common conventions followed by most modern typography.
In the “Points” tab, select Control points beyond spline. This test will look for control points lying beyond the endpoints of the curve segment on which they reside. There is rarely a reason that a control point should lie outside of the curve, so these instances usually signify accidents. It is also a good idea to select Points too far apart, which will look for points that are more than 32,767 units away from the next nearest point. That distance is larger than most computers can deal with internally, and a point that far away is almost certainly unintentional (for comparison, a single glyph tends to be drawn on a grid of about 1,000 units), so removing such points is important.
In the “Paths” tab, both the Check Missing Extrema and More Points Than [val] tests can be valuable. The first looks for points at the extrema — that is, the uppermost point, lowest point, and leftmost and rightmost points of the glyph. Modern font formats strongly suggest that each path have a point at each of its horizontal and vertical extrema; this makes life easier when the font is rendered on screen or on the page. check will look for missing extrema points. The second test is a sanity check on the number of points within any one glyph. FontForge’s default value for this check is 1,500 points, which is the value suggested by the PostScript documentation, and it is good enough for almost all fonts.
As its name suggests, the “Random” tab lists miscellaneous tests that do not fit under the other categories. Of these, the final three are valuable: Check Multiple Unicode, Check Multiple Names, and Check Unicode/Name mismatch. They look for metadata errors in the mapping between glyph names and Unicode slots.
Help yourself: run tests that can aid design
Many of the other tests in the Find Problems tool can be useful to find and locate inconsistencies in your collection of glyphs — things that are not wrong or invalid, but that you, as a designer, will want to polish. For example, the Y near standard heights test in the “Points” tab compares glyphs to a set of useful vertical measurements: the baseline, the height of the “x” glyph, the lowest point of the descender on the letter “p”, and so on. In a consistent typeface, most letters will adhere to at least a couple of these standard measurements, so the odds are that a glyph that is nowhere near any of them needs a lot of work.
The Edges near horizontal/vertical/italic test in the “Paths” tab looks for line segments that are almost exactly horizontal, vertical, or at the font’s italic angle. Making your almost-vertical lines perfectly vertical means that shapes will render sharply when the font is used, and this test is a reliable way to track down the not-quite-right segments that might be hard to spot with the unaided eye.
You can use other tests to locate on-curve points that are too close to each other to be meaningful, to compare the side bearings of similarly-shaped glyphs, and to perform a range of other tests that reveal when you have glyphs with oddities. Part of the refinement process is taking your initial designs and making them more precise; like other aspects of font design, this is an iterative task, so using the built-in tools reduces some of the repetition.
Validate font
FontForge’s other validation tool is the whole-font validator, which runs a battery of tests and checks on the entire font. Because the validator is used to examine a complete font, you can only start it up from the font view window; you will find it in the Element menu, under the Validation submenu. The validator is designed to run just those tests that examine the font for technical correctness — essentially the tests described in the “test for required features” section above. But, it does execute the tests against the entire font, and it does so far more rapidly than you can step through the process yourself using the Find Problems tool.
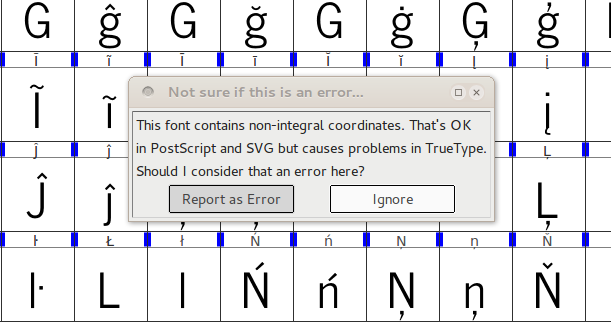
The first time you run the validator during a particular editing session, it will pop up a dialog box asking you whether or not it should flag non-integer point coordinates to be an error. The safe answer is to choose “Report as an error,” since sticking with integral coordinates is good design practice. When the validator completes its scan of the font (which will be mere seconds later), it will open up a new dialog box named Validation of [font name]. This window will list every problem the validator has found, presented in a list sorted by glyph.
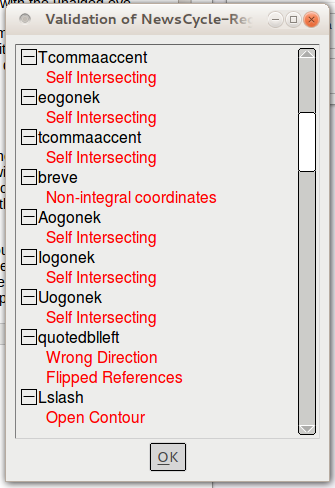
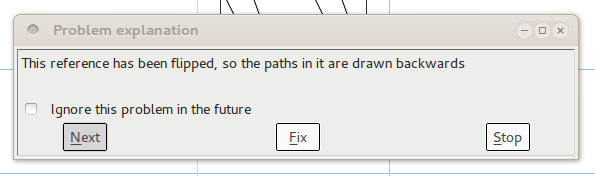
But, this window is not merely a list of errors: you can double-click on each item in the list, and FontForge will jump to the relevant glyph and highlight the exact problem, complete with a text explanation in its own window. You can then fix the problem in the glyph editor, and the associated error item will immediately disappear from the validator’s error list. In many cases, the error will be something FontForge can automatically repair, and the explanation window will have a “Fix” button at the bottom. You can click it and perform the repair without additional effort.
For some problems, there is no automatic fix, but seeing the issue on-screen will help you fix it immediately. For example, a self-intersecting curve has a specific place where the path crosses over itself — it may have been too small for you to notice at a glance, but zooming in will allow you to reshape the path and eliminate the problem.
For other problems, there may not be one specific point at which the error is located. For example, if a curve is traced in the wrong direction (that is, counterclockwise when it should be clockwise), the entire curve is affected. In those instances where FontForge cannot automatically fix the problem and there is no specific point on the glyph for the validator to highlight, you may have to hunt around in order to manually correct the problem.
Finally, there are some tests performed by the validator that might not be a problem from the final output format you have in mind — for example, the non-integral coordinates test mentioned earlier. In those cases, you can click on the “ignore this problem in the future” checkbox in the error explanation window, and suppress that particular error message in future validation runs.
Fix problems as you edit
Most of the errors that the Find Problems tool and the whole font validator look for can be corrected during the editing process, so do not feel any need to defer troubleshooting while you work. For example, the View > Show submenu has options that highlight problem areas during editing; the Element menu hold commands like Add Extrema that will add the extrema points expected in most output file formats, and checkboxes to indicate whether the selected path is oriented in the clockwise or counterclockwise direction. If you flip a shape (horizontally or vertically) in the glyph editor, you will notice that its direction is automatically reversed as well. If you click on the Correct Direction command in the Element menu, FontForge will fix the clockwise/counterclockwise orientation immediately. Getting in the habit of doing small fixes like this as you work will save you a bit of time during the validation stage later.
Does the Design Work?
Typefaces can ‘work’ better or worse in two ways: readability and legibility.
Legibility means the designs of glyphs are distinct enough to be instantly recognized correctly. Here are some pairs that are often too similar:
- the letter “L” and the number “1”
- the letter “O” and the number “0”
- the letter “Z” and the number “2”
- the numbers “1” and “7”
Readability means all the glyphs work well together for a familiar, comfortable reading experience. Creating test documents is the best way to ensure this. If you have a complete alphabet then you can typeset real text — for example using FontFriend to drag and drop your font into a long news article you wish to read, then printing it out.
However, if you font only contains a fraction of the alphabet, you can use a test text generator such as LibreText and any word processor, desktop publication application or general illustration program (such as Inkscape) to create test documents.
Testing the font in different environments
When testing fonts on Microsoft Windows, the Font properties extension can be helpful for quickly reviewing the internal font metadata, such as version numbers.
If you install development fonts that make Windows behave erratically, John Hudson described how to clear out corrupt fonts on TypeDrawers:
Restart Windows in recovery console mode. In the console, navigate to the Windows/Fonts folder, and delete all entries for the Rhodium font. Then navigate to Windows/System32 and delete the ‘FNTCACHE.DAT’ file (not the .dll) Then restart Windows. The font cache .dat file will be rebuilt, and then you can reinstall a clean copy of the Rhodium font and see if it behaves. (Don’t worry if you still get a message saying the font is already installed: at that stage Windows is lying to you.)